

- Final Fantasy XVI Curiosities Guide - July 23, 2023
- Final Fantasy XVI The Dame Guide - July 14, 2023
- Final Fantasy XVI Eikon Guide - July 13, 2023
The Final Fantasy franchise has an expansive universe that allows it to reuse elements between its games that are easily recognized, such as spell names, items, summons, and monsters. Whenever I see a Bomb, I know to be cautious and practice social distancing unless I want my face blown to smithereens.
Other creatures in the saga are also widely known, and some have even received a promotion and become cast members. Among these, I will show in this Midgardsormr Guide how this serpent went from a summon to a monster and then sprang on to become a crucial character in the plot of Final Fantasy XIV.
For history fans, the name may sound familiar. After all, Midgardsormr borrows her moniker from the mythological Norse serpent, daughter of Loki, and the giant Angrboda. In Final Fantasy, they don’t have that much relevance at first, not even when they are a ferocious monster who has caused hundreds of deaths for Cloud and his troupe. But their evolution is acknowledged when they stop being a serpent and is portrayed as a dragon in Final Fantasy XIV. Not any dragon. The father of the entire race.
Key Features
Midgardsormr has many names, mainly due to differing localizations. You may call them Midgar Zolom, Midgar Swarm, or Terrato. They debuted as an esper in Final Fantasy VI and freelanced as a monster in Final Fantasy VII, Final Fantasy XII, and Final Fantasy XV.
But due to their enormous talent, Midgardsormr was promoted and starred in Final Fantasy XIV as a prominent character. You don’t fight them directly in the MMO but through a trial of sorts and a simulacrum of what it once was.
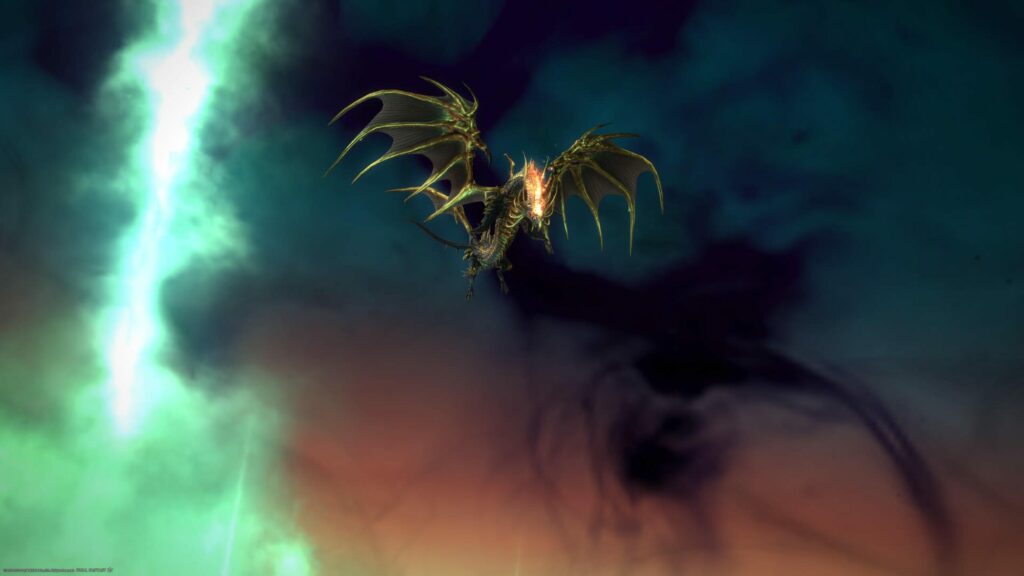
Unfortunately, Midgardsormr isn’t a playable character. Unless you consider its function as a Triple Triad card as playable. Usually depicted as a serpent, their promotion also granted him limb growth, and he became a dragon.
Midgardsormr also appears in several spin-offs of the franchise. Special consideration goes to Final Fantasy Tactics, where he resumes his summoning role, but this time on the enemies’ side.
How to get Midgardsormr in Final Fantasy VI
First, let’s start with the technicalities of Midgardsormr and the chronological order of his appearance.
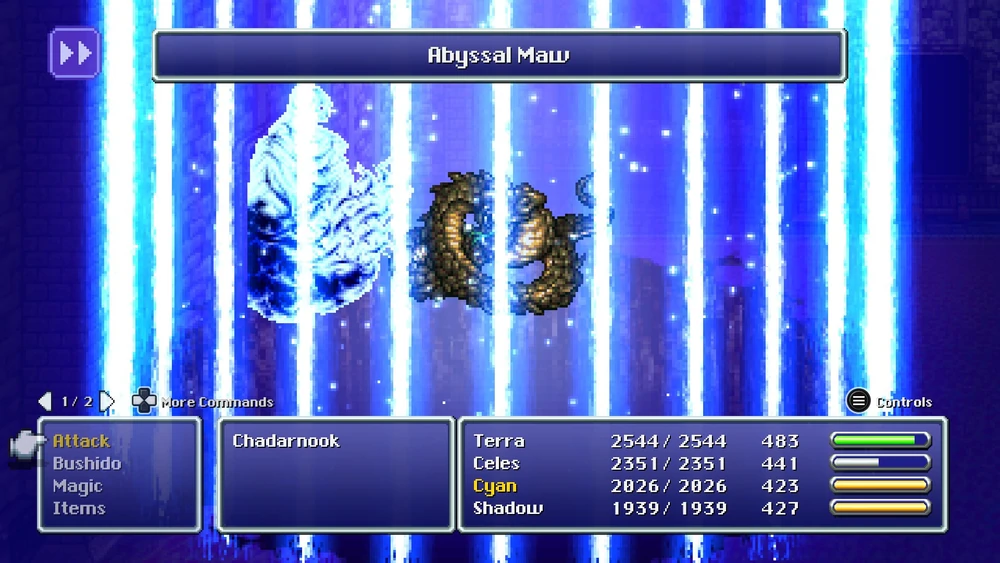
In Final Fantasy VI, Midgardsormr is an esper, i.e., a magical being that can be equipped as a magicite to teach spells to the party and summoned in battle to devastate the enemy. You can get them in the World of Ruin.
First, go to Narshe on the snowy peak where the game starts. There you will find Valigarmanda and face them in battle. Once you win, the esper will join the team and make way for an opening in the cliff that you have to jump in.
You will drop into Yeti’s Cave. Traverse the rocky walls of the cave until you fall into a supposed trap that leads you to floor B3. There, you will find bones remain that, when interacted with, will prompt you to remove a magicite from its eye socket.
When you do, you gain Midgardsormr. Easy-peasy, but there’s a caveat. Next, you will be attacked by the Yeti, the cave’s namesake. Once you defeat him, you can add Umaro to your party and leave the cave.
When summoned in battle, Midgardsormr casts Abyssal Maw (I will go with Final Fantasy VI Pixel Remaster localization), an earth attack on all foes. Equipped as an esper, Midgardsormr provides +30% additional HP at each level up and teaches three spells: Quake at an acquisition rate of x3 and Graviga and Tornado at an acquisition rate of 1x.
Even though I’m a sucker for any scaly-bad-ass monster (primarily dragons), I don’t recommend using Midgardsormr after acquiring their spells. The +30% additional HP bonus is worse than Bahamut’s, which gives a +50% HP bonus per level, and also, he’s a real dragon.
A Sneaky Enemy in Final Fantasy VII
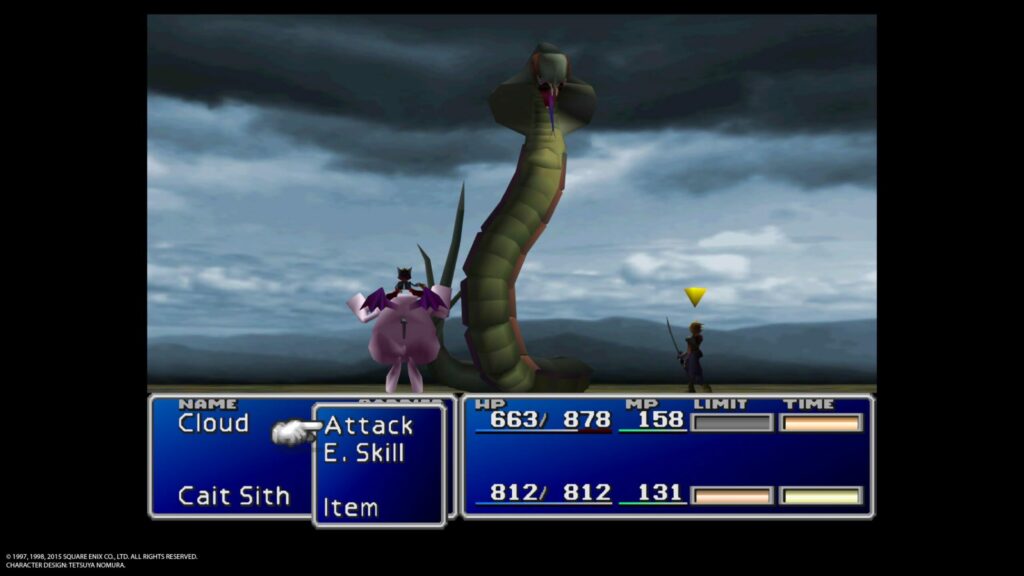
In Final Fantasy VII, Midgardsormr is called Midgar Zolom. God, I hated this bastard so much in the game. Because I was very young when I played the game, I suffered a lot at their fangs until I realized I needed a Chocobo. But once your party gets stronger, Midgar Zolom is no more than an ordinary enemy. However, its attacking pose in battle remains imposing all the same.
The enemy slithers through the swamp near Chocobo Ranch, barring the entrance to Mythril Mines for anyone who ventures on foot. Usually, you will be at half Midgar Zolom’s level at this point in the game, so beating them becomes a hardship but not an impossible feat. Furthermore, you can learn the Enemy Skill Beta, a hard-hitting fire spell, if you manage to grab it early on.
Midgard Zolom Stats
|
LV |
HP |
MP |
|
26 |
4000 |
348 |
|
Attack |
Magic Attack |
Defense |
|
120 |
40 |
90 |
|
Magic Defense |
Dexterity |
Defense% |
|
70 |
64 |
2 |
|
Luck |
EXP |
AP |
|
1 |
250 |
25 |
|
Gil |
||
|
400 |
How to Win Against Midgard Zolom Early On
First, burn some candles and do some prayers. Second, time to get prepared. While Midgard Zolom’s normal attack doesn’t hit that hard, the snake will always use Beta below an HP threshold, and that skill can send you to kingdom come.
The party level doesn’t matter much; I was at level 13, and it worked fine. Beta is a fire spell and is almost guaranteed to wipe your party when cast. But we need only one character to survive.
I used Cloud because he’s the protagonist and his only job in the game is to be stronger than the others character. And guess what, he is. Cloud has overall better attributes and more packs in his abs.
The setup should be as follows:
- Equip Cloud with a Talisman to increase his Spirit +10;
- Use a combination of Elemental material and Fire on his armor for increased resistance.
- Set an Enemy Skill and Restore material with the ex-SOLDIER.
- Other party members can have any elemental spell to help with damage, but make sure at least one wields Poison.
- Use Tranquilizers on everyone to give them Sadness status, which reduces any damage taken by 30% at the cost of slowing your limit gauge.
- Put the entire party on the back row as well to minimize damage.
The battle commenced; cast Bio in the Midgard Zolom until they are afflicted with Poison and attack with the others, keeping the party HP full at all times. The giant ol’ snake will eventually tail someone when they stand up, banning the member from the battle.
If they do this to Cloud, curl up in a corner and cry after fleeing because all our strategies went down the drain. There are beliefs that the Midgard Zolom only ejects those who attack them, but with me, she did it with Cloud even when he only stood there soaking the bites.
When their HP is below 50%, Midgard Zolom will eventually counter-attack with Beta, killing the member that was not ejected from the battle and doing severe damage to Cloud – who should survive and learn the enemy’s ability. Heal Cloud and fight fire with fire, spamming Beta to chunk away 1000 HP from the serpent, killing them.
Phew, not that hard, hey? Just be sure to run for it because another Zolom will spawn immediately and try to get revenge for their sibling. On the bright side, with the Beta enemy skill, you will effortlessly kill most bosses until later on in the game.
The Rare Game in Final Fantasy XII
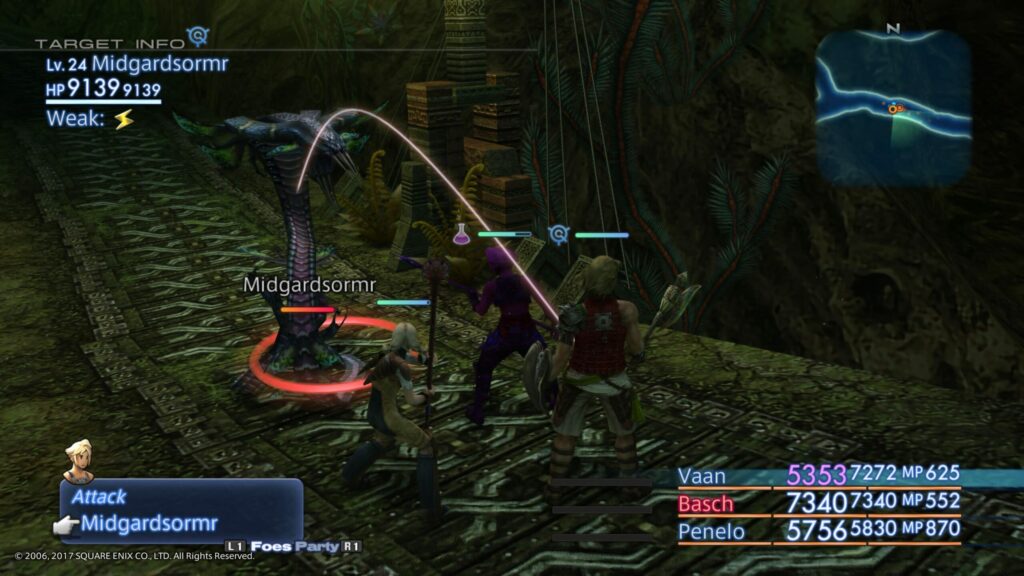
In Final Fantasy XII, Midgardsormr is a somewhat unusual but forgettable enemy. It’s a Rare Game, meaning a monster that replaces another one of the same kind as soon as specific requirements are met. Rare games are enhanced versions of ordinary monsters that can drop neat items or have them stolen.
This Midgardsormr has a 20% chance to spawn near the northern Golmore Jungle near the exit to Ozmone Plains. But when I say 20%, it looks more like 0.20%! I ran around for about 40 minutes – fast forwarding – just to find this rascal and take a decent screenshot. Look at how Vaan HP was slowly draining to poison while I was looking for an angle to enhance the snake’s profile. (Truth be told, they weren’t registered on my Bestiary either, so cheers!)
It surprised me how awkwardly frail they were and didn’t add much to the hunt. However, you can try to steal a Great Serpent’s Fang with a slim chance of 3% or 6% with Thief’s Cuff equipped. The item can be sold to the bazaar to make the Artemis Bow, a bow that requires the Bow 7 License Board active. It’s the strongest bow before those whose License harbor their names.
FFXII’s Midgardsormr Stats
|
Level |
HP |
MP |
|
24 – 25 |
9,139 – 9,249 |
234 – 249 |
|
Strength |
Magick Power |
Vitality |
|
29 – 31 |
14 |
57 – 58 |
|
Speed |
Attack Power |
Defense |
|
17 – 18 |
35 – 36 |
14 |
|
Magick Resist |
Evade |
EXP |
|
12 |
4 |
1,615 – 1,708 |
|
LP |
CP |
Gil |
|
5 |
880 – 961 |
0 |
Final Fantasy XIV starring Midgardsormr
First of all, I must warn you that if you have not played the Normal Raids of Stormblood or the Main Scenario Quest of Endwalker, we will have some spoilers below.
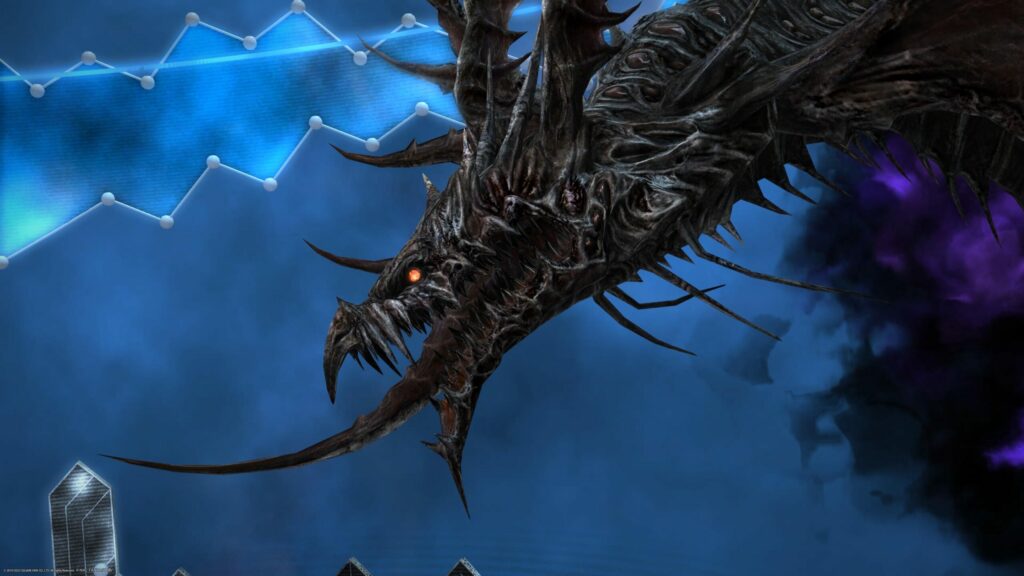
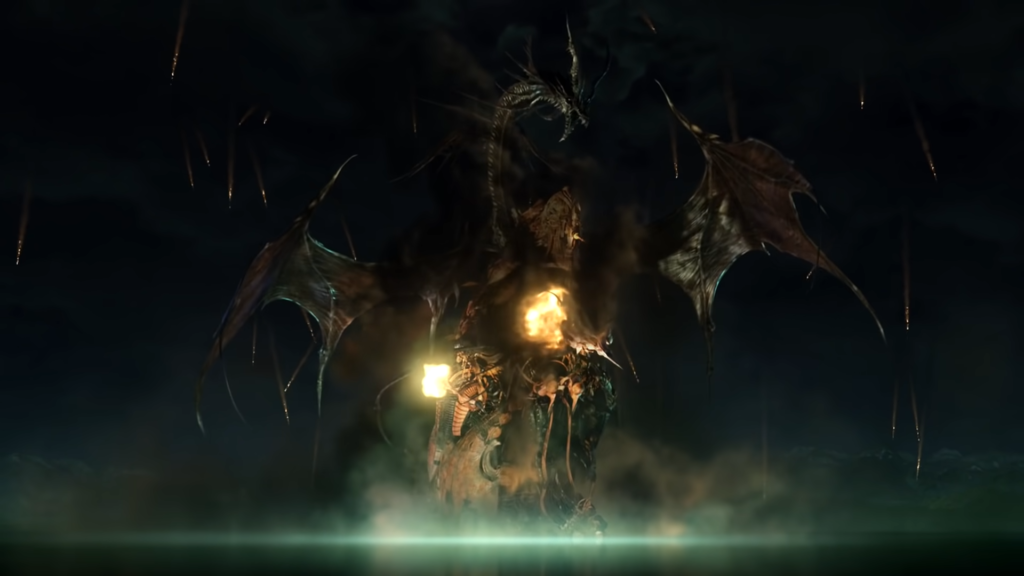
In the acclaimed MMORPG, Midgardsormr was recognized for all his (he’s a male here) talent and pomp and went from a mere serpent to a majestic dragon that not only influenced the narrative of Final Fantasy XIV but allowed him to become an unwitting protector of Eorzea.
The character has been present since version 1.0 of the game, becomes an essential ally in Heavensward, and has his backstory revealed in Stormblood. Oddly enough, I first played FFXIV on the Midgardsormr server, so he and I instantly connected as soon as I logged in to the game.
Traveling the Sea of Star
Midgardsormr was born on the planet Dragonstar, which, as you can tell, was the home of dragons. However, when his planet was targeted for conquest by the Omicrons, Midgardsormr did everything possible to protect it. However, organic matter was at a disadvantage versus the Omicrons’ artificial creations, especially Omega, whose regenerative ability overpowered Midgardsormr’s raw mighty.
Devoid of alternatives, Midgardsormr took his seven eggs and fled the planet. After sailing the Sea of Star for an untold duration, he finally arrived at Hydaelyn. To ensure a peaceful stay, the father of the dragons made a deal with the mother crystal to reside on the planet with his seven offspring. Henceforth, all the dragons we know and love so much in our adventures are born.
The Guardian of Silvertear Falls
Upon his arrival in Hydaelyn, he’s said to have been tasked by the God of Time, Althyk, and the Goddess of Fate, Nymeia, to protect the source of magic in the world, supposedly located at Silvertear Lake. There, Midgardsormr sired the seven elder wyrms that populate the planet: Bahamut, Tiamat, Hraesvelgr, Nidhogg, Ratatoskr, Vrtra, and Azdaja.
Later on, he adopted the dragon-like Warrior of Light Ryu Akechi, which is my character in Final Fantasy XIV and has no relation whatsoever to Midgardsormr background, so scratch this last paragraph.
During Gaius van Baelsar’s conquest, after the legatus had taken over Ala Mhigo, he extended his invasion to other parts of Mor Dhona. To the Black Wolf’s dismay, as the imperial fleet flew over Silvertear Falls, Midgardsormr considered it an affront to the source of magick and struck first and hard as a Cobra Kai member would. The war between the Dravanian Horde and the Garlean Empire that would become known as the Battle of Silvertear Skies began.
The father of dragons and his horde overpowered the Garlean empire. In the coup de grace, Midgardsormr coiled himself at the mightiest of all vessels, the Agrius, destroying the flagship. However, the vessel’s ceruleum tanks exploded, killing Midgardsormr on impact, deforming the Silvertear Falls environment, and releasing the seal that prevented the beast tribes from summoning their dreaded primals.
Keeper of the Lake Awoken
Fifteen years after Midgardsormr’s demise and Dalamud’s Fall, the astrologians of Ishgard began to saw changes in Dragonstar and alerted the higher-ups. This prompted Ser Aymeric of Borel to beckon aid from the protectors of Eorzea, the Scions, for them to investigate the Keeper of the Lake.
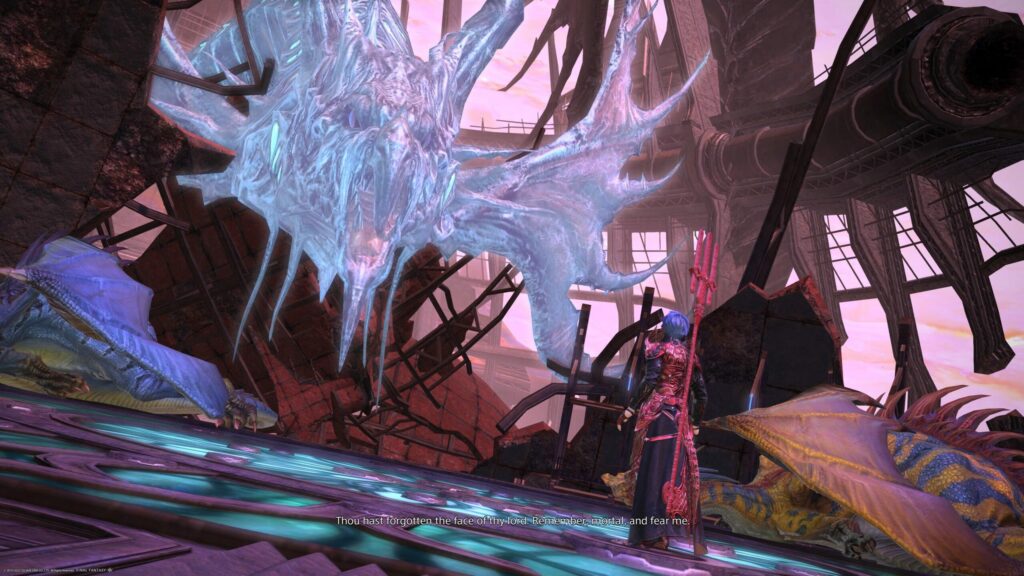
At the top of Agrius’ wreckage, Warrior of Light encounters the spirit head of Midgardsormr, who challenges us. After his victory, the dragon shows his position regarding the Ishgard war and says that he was awakened by the wrathful crying of his son, Nidhogg. But when he feels Hydaelyn’s protection at the Warrior of Light, he remembers his pact and promises not to hurt our champion.
However, he feels entitled to strip us of Hydaelyn’s blessing, dimming our crystals. Midgardsormr begins to accompany us to watch and wait in a miniature avatar format. The dragon says he found a new life by drinking from Hydaelyn’s vitality. He didn’t die at the Agrius explosion, suggesting he was only dormant.
Patiently Waiting and Observing
The dragon accompanies the Warrior of Light through all the events in Heavensward, observing man and dragon alike in their struggles. He reveals himself to Ysayle and is surprised when he notices that the Warrior of Light gradually regains the Blessing of Light on their own. In Azys Lla, Midgardsormr takes us to her daughter Tiamat, and there we learn about her and Bahamut’s past.
Our last crystal regains its brilliance, and the Blessing of Light shrouds us once more. Midgardsormr recognizes that we are stronger than any other mortal – the weight of protagonism – and worthy of Hydaelyn’s light. At that moment, kid Midgardsormr grows into teen Midgardsormr and offers his wings to us, becoming a majestic mount.
When Aymeric was holding a rally to declare an end to the Dragonsong War and peace among the dragons, Midgardsormr warns him of Nidhogg’s untold wrath and that he would come back to threaten the fragile peace.
Nidhogg indeed returns, and we go to Hraeslvegr to ask him to help us confront his brother. With a nudge from his daddy Midgardsormr, Hraeslvegr concurs. After a gruesome battle, we separate Nidhogg from Estinien and cast his eyes into the abyss.
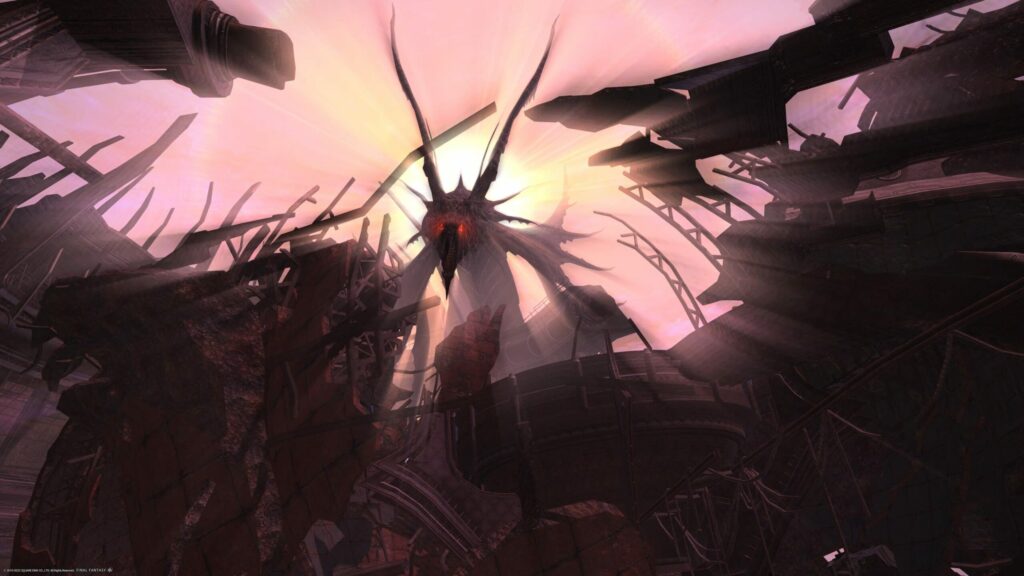
Omega and Midgardsormr
In the Stormblood raids, Cid and Ironworks encounter Omega, and Midgardsormr awakens, helping them to understand what Omega is and its motivations. Through Alpha, a Chocobo-like being created by Omega, the superweapon tries to lure mighty warriors to its Interdimensional Rift.
There, warriors from other dimensions will fight each other so Omega can analyze their abilities and evolve, so it can return to its home planet. Omega recognizes Midgardsormr and does not understand why he helps humans.
After winning several trials, Omega can’t grasp the strength of the Warrior of Light and forcefully tries to imprison us to use as a guinea pigs in its studies. Midgardsormr manages to assume his true form and help the Warrior of Light escape prison.
Still, the ordeal toll was high, and the dragon returned to sleep to recover. As Omega continues with his challenges, the superweapon eventually shares Midgardsormr’s past, commenting on how he was defeated by the dragon and has created a simulation of that to battle the Warrior of Light. An imperfect simulacrum, however. Omega was prematurely defeated and didn’t witness the full draconic splendor.
When the Warrior of Light triumphs over Omega’s numerous tribulations, t weapon itself joins the fray. Upon defeat, the Interdimensional Rift begins to destroy itself, threatening to take our protagonist along with it.
Even in his sleep, Midgardsormr manages to contact Hraeslvegr and asks his son to help the Warrior of Light. As a good son obeys his father, the elder dragon does so and flies our champion away before the location vanishes from the map.
In the subsequent expansions, Midgardsormr is still dormant and recovering. His appearances are minimal, restricted to a “What If” of the alternate future should the Black Rose be unleashed on the world. He also allows his son, Vrtra, to lend his dragon scales to the Ragnarok refurbishment.
As we travel through the Sea of Stars, we glimpse a recreation of the Dragonstar and those who remained after the Omicron laid waste to their planet.
Final Fantasy XIV Keeper of the Lake Fight
The dungeon Keeper of the Lake had a satisfying surprise at the end that made me smile. Whenever I traverse a new dungeon, I observe the small guides in the corner directing me to the next step. Things like “reach the Hall of the Thunder God,” “defeat the Deathbringer,” “record Friend’s season 7,” and so on. Usually, this gives a mini-spoiler of which boss we will face next.
But not in Keeper of the Lake. In this FFXIV dungeon, the last boss was cloaked with several question marks, so when I reached the end and realized the father of the dragons would be my enemy, oh boy, a mixture of terror and fascination filled me. Long story short, I … smacked him up.
So, as I was saying, at the end of the dungeon, a ghostly Midgardsormr popped up and challenged me, the almighty Warrior of Light, accompanied by three other players with the same moniker. However, much to my chagrin, the dragon didn’t face us directly but put us through a type of trial. The fight is not hard, but it can punish the unaware and cause a sudden wipe.
There are rare moments when you can do direct damage to Midgardsormr’s giant head. You will need to defeat the ads to cause significant damage while dodging several AoE attacks. At the start of the battle, his head is targetable, so smack him while avoiding all attacks.
As soon as he awakens the yellow dragon, the tank should grab him while the party does what it does best. It’s recommended that the tank pull the add away from Midgardsormr and off-center. The minion will receive a buff if you leave it too close to its great-great-great-grandfather.
Eventually, Midgardsormr will summon another drake in the center of the platform that must be fast disposed of. Upon his death, a Field Generator will appear. The boss will begin casting Animadversion. Before he unleashes the spell, the party must use the Field Generator to generate a protective bubble and encase themselves.
Anyone caught in the attack unprotected will die. After surviving, refocus on the yellow dragon until it perishes. Midgardsormr will take a chunk of damage and become vulnerable to your attacks, so seize the moment.
Next, the dragon head will awaken the blue dragon, which must be tanked close to the boss to avoid a buff. Dance around the arena, avoiding the countless AoEs. Preferably, do not stand close to a party member because as soon as Midgardsormr releases a fire puddle, some AoEs will emerge where the party members are standing. It will be difficult to dodge if two or more are close together.
If you take your time killing the blue dragon, Midgardsormr will summon another drake which must be defeated to spawn a Field Generator. Activate it as before to avoid wiping and then smash the cerulean dragon to death. Midgardsormr will take another considerable damage when the grunt dies, and you can nail the last nails in his coffin.
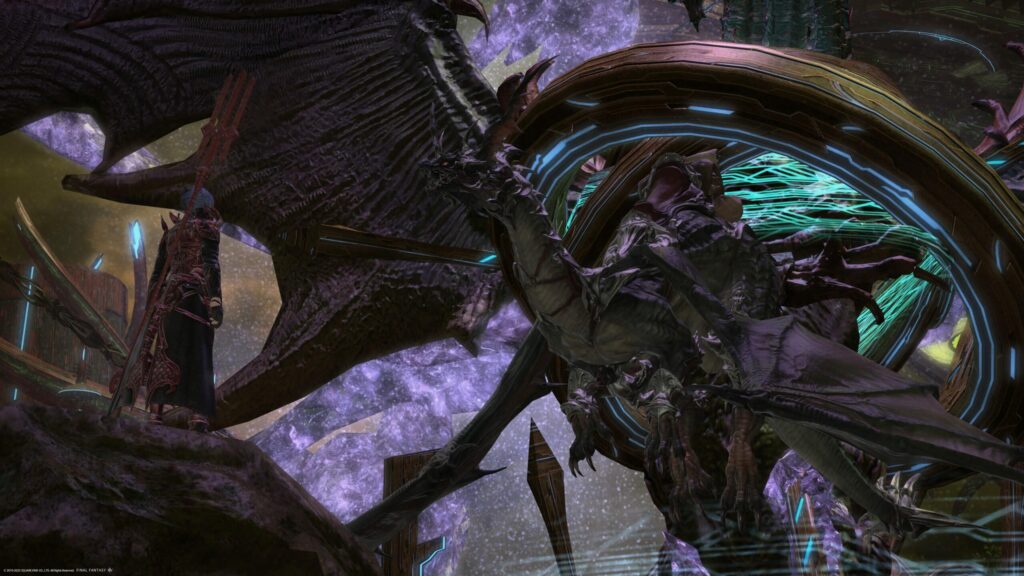
Final Fantasy XIV Alphascape V2.0 Fight
This fight is the simulacrum of Midgardsormr created by Omega. In it, we face what is supposed to be the original version of the dragon all-father as seen by Omega before its defeat. Like all normal raids, most fights are error-prone and can be recovered throughout their duration. Knowing a few mechanics beforehand ensures that you don’t die as much or get blatantly carried away by your party.
Keep your eyes peeled because Midgardsormr’s attacks differ according to his movement as he draws ambient aether. He will either spin or flip, and those combinations will define his next attack. Two spins mean he will do an AoE close to him, so players must back away.
A spin plus a flip will cause a donut AoE attack, so players must tuck him close to the boss. And lastly, a flip followed by another flip will deliver a cross-shaped AoE, and you must stand in one of the corners to avoid damage.
He will spin twice in the first Dragon Dance. After that, some players will be marked with Earthshakker and must stand back to avoid overlapping damage. Afterward, join your party because Akh Morn will hit multiple times, and the damage must be soaked holding hands.
Dragon Dance, spin and flip combo, and everyone must get within Midgardsormr’s target area. Four players will be marked with a purple AoE and must move away to not hit their friends. Four more AoEs will appear below random members when the thunder jolts down on the four previous marked players.
The next Dragon Dance will be a double flip, and players must run to the corners. In sequence, two blizzard markers appear on two players, who should preferably take them distant to the party. Midgardsormr will perform another double flip, so the ice puddles will continuously grow. It would be disastrous if it expands while you are in a safe spot.
Midgardsormr will fly away and appear in one of the corners of the map, preparing to cross the arena dragging any nearby passerby. At the same time, several orbs will spawn at the edge of the arena, and you will need to dodge the squared AoEs they will generate.
An ancient dragon will spawn, surrounded by immortal keys. The keys will tether to the dragon and make it immune. Destroy the objects and then focus on the minion. The dragon has a frontal frontal frontal cone attack, so avoid staring into its eyes.
Defeat it before the Aether gauge reaches 100, or meet up with your party in the afterlife. When Midgardsormr returns to the arena, he will use a tankbuster and Exaflare, moving AoE blasts starting from the edge. Random AoEs will pop under players as the Exaflare moves, so keep on your toes.
The boss will conjure Northern Cross, covering the arena in ice and giving you a free ticket to skate. At each movement, you will slide uncontrollably across the place. Midgardsormr will use either a double spin or a spin and flip combo to spice things up.
Position yourself properly to dodge the appropriate combination. The ice will melt, and the daddy dragon will cast Akh Rahl, continuously damaging players who remain stationary in the blue flames. Hurry to the corner because a double flip follows, and watch out for players marked with a purple AoE.
He will fly again, reappearing in one of the corners, ready to dive you to death. At the same time, an Exaflame cross the arena. Midgardsormr will dip once more before reappearing in the center, using a random Dragon Dance combo while marking players with Earthshakers. The mechanics will start repeating themselves but overlapping with each other.
Four random AoEs will target four lucky players, and Midgardsormr will prepare to unleash Akh Morn in another one. So you need to avoid the random AoE while grouping. The dragon will cover the floor with ice while throwing ice puddles at some players. Keep doing what you do best, and soon the Midgardsormr simulacrum will taste a real defeat.
A Common but Fierce Enemy in Final Fantasy XV
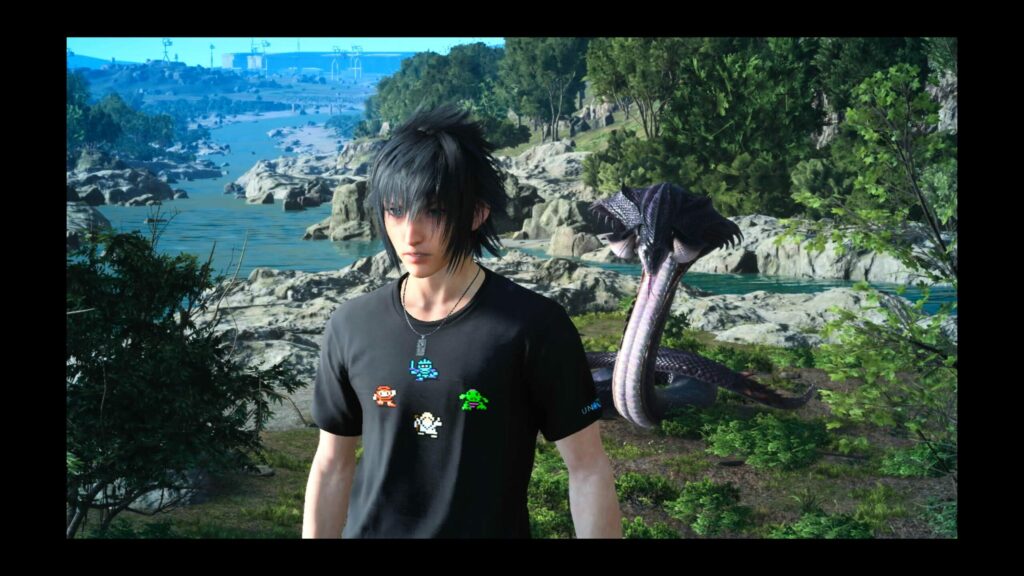
In Final Fantasy XV, Midgardsormr returns to his role as a common enemy. The first time I met him, I felt like a schoolgirl who suddenly bumped at Justin Bieber on Forever 51. After Midgardsormr’s role in Final Fantasy XIV, expectations were through the roof. But hey, there’s a reason behind the saying “never meet your heroes.”
Midgardsormr XV’s design is still exquisite and menacing that it could easily pose as an early boss. The snake has three variants, Alpha, Beta, and Gamma – we are mixing Nordic and Greek now, got it. It can appear as a common enemy in Cleigne, on the Serpent of Risorath Basin quest, and on a Timed Quest on the 18th of the month.
FFXV’s Midgardsormr Stats as a Common Enemy
|
Level |
HP |
Size |
|
54 |
146900 |
3 |
|
EXP |
Libra |
Strength |
|
1404 |
20 |
22770 |
|
Vitality |
Parry |
Spirit |
|
192 |
Yes |
231 |
The hunt version of Midgardsormr is slightly stronger, and the Timed Quest has the same attributes. The strategy for killing the enemy is more or less the same as every other enemy in Final Fantasy XV. Abuse Warp Strikes, parry whenever possible, and hold the dodge button endlessly.
Like their sibling from Final Fantasy VII, this Midgardsormr has a habit of burrowing underground, looking for their prey and emerging like a geyser when finding a helpless one. Should they give you a suffocating hug, you can escape with a Warp Strike or endure and wait for the opportunity for a parry attack. One-handed swords, daggers, and ice are the best options to face this Midgardsormr.
FAQ
Question: Is Midgardsormr Bahamut’s father?
Answer: In Final Fantasy XIV, yes. In the others, no. In most Final Fantasy, he’s not even a dragon and is portrayed as a serpent, as Norse mythology dictates. But in Final Fantasy XIV, he’s Bahamut’s father and the predecessor of all the dragons that live in Hydaelyn.
Question: How do I get Midgardsormr in FFXIV?
Answer: After completing the Main Scenario Quest “Fetters of Lament,” you automatically acquire Midgardsormr as a mount.
Question: Can I kill Midgardsormr early in FFVII?
Answer: Yes, you can. It does demand some preparation first, but with the right set of materials, a status effect, and equipment, you can not only kill the damn serpent but get a powerful Enemy Skill early on.
Attach Elemental material with Fire on your body armor, use Tranquilizers to cause Sadness on party members and put everyone in the back row. Remember to put the Enemy Skill material on the same character as the Elemental.
Equip Poison material so you can cast Bio and drain its health slowly. Then, when Midgardsormr uses Beta, the character with the Elemental material can survive the impact and learn the skill so you can fight fire with fire and kill the beast skillfully.
Conclusion
I love Midgardsormr. Really. Not the same way I love my Lhasa or my girlfriend – that would be weird – but I would buy a T-shirt on the spot if it had his gorgeous face printed on it or even change my Alexa name to his name so it would stop my younger sister of asking her endlessly pointless questions. Midgardsormr is a living example of why the world-building and gaming bible of the Final Fantasy series is so rich.
Midgardsormr was just a recurring monster, which still causes nightmares for FFVII players, but managed to become an insane memorable character in Final Fantasy XIV. Ok, as an esper, they may not be that striking. Some players may have missed them as an enemy in Final Fantasy XII and Final Fantasy XV.
But suppose you play the acclaimed MMORPG Final Fantasy XIV. In that case, you surely know and are aware of all the glorious history and grandeur of the father of all dragons – consequently, my daddy. Honestly, after seeing him as a character in Final Fantasy XIV, I have to say that his future appearances should be at least as relevant or awe-inspiring. If not, it will be a disservice to who he is.